톰캣의 세션 타임아웃 시간은 conf/web.xml 파일에서 변경할 수 있다. session-timeout 값의 기준은 "초" 이다. 86400
톰캣에서 Redis를 통해 세션을 공유해보자. 톰캣 설치 폴더의 lib 폴더에 아래 세개의 파일을 추가한다. commons-pool-1.6.jar / jedis-2.1.0.jar / tomcat-redis-session-manager-1.2-tomcat-7.jar tomcat-redis-session-manager는 톰캣 버전에 따라 다운로드 받으면 된다. (본인은 톰캣7 사용) https://github.com/jcoleman/tomcat-redis-session-manager 톰캣 설치 폴더의 conf 폴더에 있는 context.xml 에 아래 부분을 추가한다. 톰캣 재시작!!
Tomcat 7 부터는 압축을 자체 지원한다. server.xml에 아래처럼 설정하면 mime-type을 지정할 수 있다. (톰캣 재시작) 응답헤더를 보면 gzip으로 넘어오는 걸 확인할 수 있다. Content-Encoding:gzipContent-Language:ko-KRContent-Type:text/html;charset=UTF-8Date:Thu, 27 Feb 2014 10:53:45 GMTServer:Apache-Coyote/1.1Transfer-Encoding:chunkedVary:Accept-Encoding ** Ehcache의 Gzip compression 를 사용하려면 다음 링크를 참조 http://misoin.tistory.com/46
pom.xml에 ehcache-web 추가 net.sf.ehcache ehcache-web 2.0.4 web.xml에 filter 추가 gzipFilter net.sf.ehcache.constructs.web.filter.GzipFilter gzipFilter *.html gzipFilter *.htm gzipFilter *.jsp gzipFilter *.js gzipFilter *.css 아쉬운 점은 filter를 mime-type으로 설정하는 게 없는 듯... (못찾겠다...) mime-type으로 설정할 수 있으면 좋겠는데... /* 이것 또한 안되고... ================================================================================..

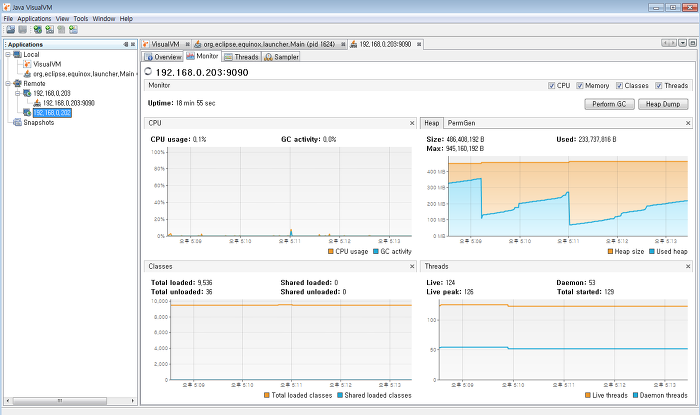
모니터링을 하기 위해 톰캣의 catalina.sh 에 아래와 같이 설정하고 톰캣을 재시작하면 된다. # vi /usr/local/tomcat/bin/catalina.shJAVA_OPTS="$JAVA_OPTS -Dcom.sun.management.jmxremote=true \ -Dcom.sun.management.jmxremote.port=9090 \ -Dcom.sun.management.jmxremote.ssl=false \ -Dcom.sun.management.jmxremote.authenticate=false \ -Djava.rmi.server.hostname=192.168.0.202" 포트는 충돌나지 않는 걸로 아무거나 설정하면 됨 (예: 9090) 호스트네임에는 해당 서버의 아이피를 적어줌 포트 ..
# cd /usr/local/src # wget http://apache.tt.co.kr/tomcat/tomcat-6/v6.0.36/bin/apache-tomcat-6.0.36.tar.gz # tar zxvf apache-tomcat-6.0.36.tar.gz # cp -Rf apache-tomcat-6.0.36 /usr/local/tomcat # cd ../tomcat/ # ll Total 144 -rw-r--r-- 1 root root 37951 11?? 15 16:42 LICENSE -rw-r--r-- 1 root root 558 11?? 15 16:42 NOTICE -rw-r--r-- 1 root root 9188 11?? 15 16:42 RELEASE-NOTES -rw-r--r-- 1 root r..
tomcat + nginx 연동하기에서 tomcat을 설치했었다. OpenSSL을 이용해 Self-Signed SSL 인증서 만들기에서 자체 서명된 인증서를 생성했다. 이제, tomcat에서 ssl를 적용해보자. apr을 이용할 것이므로, (Using an APR Connector to Configure SSL) 1. apache apr를 설치하고 (Apache Portable Runtime) 2. tomcat native library를 설치하자. (Apache Portable Runtime (APR) based Native library for Tomcat) 먼저 apr 설치 # cd /usr/local/src # wget http://apache.tt.co.kr//apr/apr-1.4.6.tar.g..